Klipper (MOD)
Can you run Klipper on the stock mainboard of the Go and Neo?
Oh yes, you can!
The Huada HC32F460 MCU is officially supported and implemented in the Klipper firmware.
Important Information To Be Aware Of
- It should already be mentioned here that you can always go back to the stock firmware by just re-flashing it, so you might just want to give Klipper a try.
- Be aware of the fact that the control unit and display of the printer doesn't work after flashing Klipper due to the fact that the SPI the unit is connected to isn't supported by Klipper yet. See the belonging section further down below for more information.
- You'd need a host to run additional software like OctoPrint or Mainsail for being able to use the printer with Klipper. See the belonging section further down below for some information and my personal recommendation abput what to use.
If you don't have a host running OctoPrint/Mainsail/.. yet, see the chapter "Printserver" for some information about hardware you could use for that.
What Is Klipper?
Long story short: Klipper is an 'alternative' firmware which gives you way more possibilities and even functions for configuring and using your 3D printer. If you don't know what Klipper is, this may be a good start for your research: All3DP: Klipper
Discussion Thread About Klipper
I opened a discussion thread about Klipper just in case any further questions arise or in case you want to comment on certain things without doing so by sending me an email. Keep in mind though that I'm not an expert at all, so if you do have specific questions about Klipper, please refer to the official documentation of Klipper, the Klipper discourse group and/or ask in a special forum like e.g. the Klipper subreddit.
Requirements
If you want to use Klipper with your printer, you'll need additional hardware for having a host running Moonraker and Mainsail/Fluidd/Octoprint on, which then gets connected to the printer (which has to be flashed with the Klipper firmware of course). This doesn't has to be a RaspberryPi, pretty much every device you could run Linux on is suitable. Just use the KIAUH script for an easy installation of the belonging software like Moonraker and e.g. Mainsail.
Please see the chapter "Printserver" for some hardware I listed which you could use for that.
I'd like to mention that you don't necessarily need a host with a (touch) screen though, as the host is connected to your network and you'll access the UI of e.g. Mainsail through your browser (or by using an additional app on your smartphone or tablet, there are many ways to get in touch with your printer actually).
So just to make it clear: let's assume you have an old laptop laying around with maybe a broken screen, or you only have a limited amount of space and no place to put your old laptop with a working screen - you could use both ones just fine. Just connect the device to a power outlet, to your network and to your printer, put it somewhere on a shelf or wherever it suits you and you're good.
However, there are options to e.g. add a touchscreen to your host or use an old android device with e.g Klipper Screen running and place it close to your printer, so that you have a control unit at the printer itself as well. But that absolutely isn't mandatory.
Installation
Credits to reddit user xpeng121 who initially posted how to get Klipper running on the Go and the Neo: Install Klipper on Kobra Go or Neo.
Basically you need to clone the Klipper repository and compile the necessary klipper.bin file (aka firmware.bin) which you flash onto the mainboard then. Please watch out for some dedicated tutorials about this procedure, as I don't offer a step by step guide here (yet) about it.
For further information about the installation steps please read the chapter "Installation" of the official Klipper documentation.
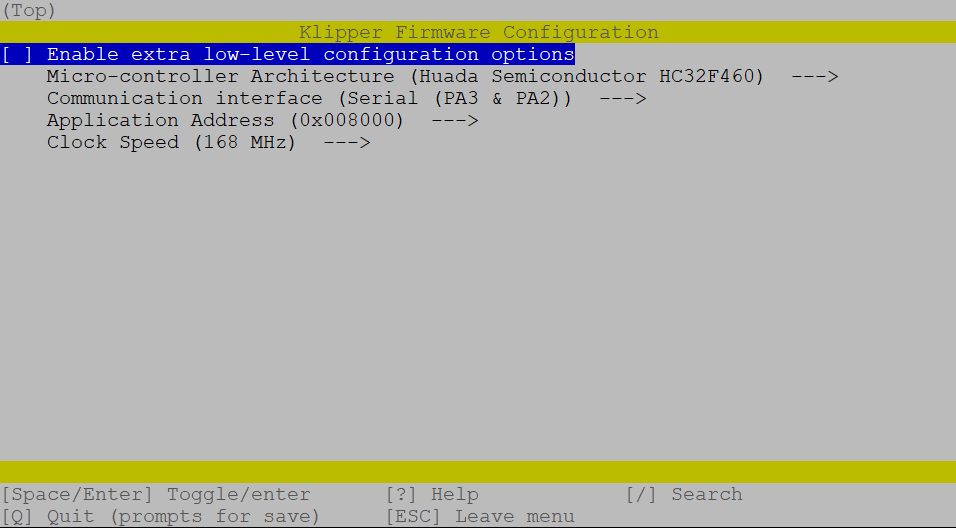
To build the correct firmware, use the following configuration during the setup process for creating the klipper.bin file:
- Micro-controller: Huada Semiconductor HC32F460
- Communication interface: Serial (PA3 & PA2) - Anycubic
You also now have two more options to choose from, the clock speed and the app address:
- The 200MHz option was added in June 2023, see hc32f460: Revert default clock back to 200MHz.
Due to @jokubasver findings described here it doesn't seem to be advisable to use the 200MHz setting right now. - About the app address option: also that was added in June 2023. The option "0x10000" is for the Kobra 2 though, so it's not for us (Go/Neo) (see hc32f460: Add app address 0x10000) - use the option "0x008000".
The following screenshot provided by @jokubasver shows the settings that should be used when choosing the options for compiling the klipper.bin file.
Compiled klipper.bin Available
I set up a repository where you can download the compiled klipper.bin (aka firmware.bin): Klipper4KobraGoNeo.
Thanks to the mentioned users there for providing the files to me!
USE AT YOUR OWN RISK!
Use KIAUH For Installation
If you're installing Klipper and frontends on different hardware like a Raspberry Pi and therefore don't use e.g. the MainsailOS image for the RPi, you can use KIAUH, which is an installation script for Klipper, KlipperScreen, frontends like Mainsail and so on.
Installing Frontends As A Docker Container
If you want to install frontends like e.g. Mainsail as a Docker container, check out the prind repository.
Once you've created the firmware.bin file, copy it to the root directory (means, directly onto the card, not in a subfolder!) of your mSD card. I personally would suggest to remove all files from the mSD card and only copy the firmware.bin file onto it.
Then you flash it as you would do with the stock firmware.
Means, you turn off the printer, put the card into the cardreader and turn on the printer.
Note that the screen doesn't update though after the flash procedure is done as the control unit doesn't work with Klipper anymore. It might show the message "Firmware update. Please wait." and stick with it OR it doesn't show anything at all!
So just wait 5-10min to make sure everything had time enough to be installed.
Then turn off the printer, remove the card, connect your host which has OctoPrint/Mainsail/.. running with the printer using an USB-C cable and turn on the printer again.
If it doesn't boot the stock firmware now, you successfully flashed Klipper.
Now you should be able to connect OctoPrint/Mainsail/.. with the printer. If an error message pops up that no connection to the MCU was possible, click on "Restart Firmware" or turn off the printer and switch it on again.
Warning
- After flashing Klipper's
firmware.bin, don't try to start printing right away! - Keep in mind that even though the stock mainboard of the Go and the Neo is the same, you have to adjust certain settings of the file
printer.cfgdepending on your specific model before starting to print or calibrate the printer! So don't try to start printing right away! - Proceed with the configuration checks before you're trying to print anything!
- Make sure to adjust the offsets for both the z-endstop (command
Z_ENDSTOP_CALIBRATE) and the probe (commandPROBE_CALIBRATE) as well - those are two independent steps and need to be done prior to printing!
Configuration
Besides the firmware.bin of Klipper (aka klipper.bin) you also need a file named printer.cfg which contains the specific settings for your model. Please refer to the official Klipper documentation about configuring Klipper.
Preconfigured printer.cfg Files Available
You can find preconfigured printer.cfg files for both the Neo in the belonging repository I set up for this: Klipper4KobraGoNeo.
For the Go you also find a preconfigured file named printer-anycubic-kobra-go-2022.cfg within the official Klipper repository.
Before you can start with the beforementioned tests to see if anything works correctly, you should check and adjust the settings in the file printer.cfg if necessary. Don't start to print right away!
I won't mention and explain all the settings here as you can just use the official documentation of Klipper to see what each setting means.
However, there is one thing I'd like to point out right now as it's causing trouble if one doesn't check on that: the lines include specific_filename_here.cfg in some of the example printer.cfg files that are available. I'll go into detail about that in the section "include additional.cfg", so please make sure to read that section as well.
Adjust The cycle_time For The Fans
There is one specific setting I'd like to mention here though as it may cause problems if you don't adjust that. It's the setting [fan] for the part cooling fan.
So, in the file printer.cfg there is a section for the settings of the fans. Klipper is using software PWM by default, the default frequency here seems to be 100Hz.
However, users reported dying part cooling fans shortly after switching to Klipper (you can find one of the discussions here). This problem seems to be related to the default PWM frequency.
After investiganting the problem it seems that the fan runs at 20kHz when using the stock firmware as @xiaopeng12138 found out. So I'd recommend to change the belonging setting for the part cooling fan to the specific "cycle_time" value "0.000050" which is 20kHz if it's not already set in the specific printer.cfg you're using.
This is the belonging section and the setting for the part cooling fan:
Special Functions
In the following I'll list some of the special functions which make Klipper so interesting and outstanding compared to the stock firmware, besides the fact that you can adjust the firmware settings to your own needs.
G-Codes
Klipper uses extended g-codes.
Therefore one has to be aware of the fact that not all of the 'regular' G-code commands are known and useable within Klipper.
See the g-codes chapter of the official Klipper documentation for an overview of the specific commands.
Slicer Setting: G-Code Flavour
Look out for a setting in your slicer called something like "G-Code Flavour". If it's available, set the flavour to "Klipper".
In PrusaSlicer you can find this setting under "Printer Settings" -> "General" -> "Firmware" (you need to have "Expert" mode activated to get access to that option!). The following screenshot shows that setting.

Macros
You can also use macros in Klipper.
Basically a macro is a collection of g-code commands Klipper should execute.
This macro is created and saved as an own file one calls in the printer.cfg then with the [include] command.
You can set up your own macros to set up certain routines like when you want to change filament midprint or to e.g. use scripts to do automatic backups of your Klipper configs.
Instead of creating one file for each macro and call it, you can also create only one file and put all of the macros in there - then you simply have to call that one specific file in the printer.cfg.
As an example: you create a file called gcode.cfg where you list all the macros with the specific commands and then you simply add [include gcode.cfg] to your printer.cfg. You can see an example of such a gcode.cfg file in my Klipper4KobraGoNeo repository here.
Please read the expandable textboxes below for some further explanations about the [include additional.cfg] command!
Include Additional.cfg
You can include additional config files from the main printer config file as well by adding this command line to the start of the printer.cfg file: [include additional.cfg], where "additional" will be replaced with the specific filename then.
In this "additional" config file you can list certain macros you created or you can list certain settings which will be loaded during the startup of Klipper.
By doing so, you not only keep your main printer.cfg short and easier to read, but you can also activate or deactivate loading certain settings for example by commenting or commenting out the specific "include" line.
Usually one does this for calling a macro from the start-gcode section of your slicer. If you are using my printer.cfg for the Neo, then you'll see the line #[include gcode.cfg] at the beginning of that file. Then you also add the file gcode.cfg to the location of your Klipper installation where the printer.cfg is located (make sure to rename the file to gcode.cfg) and remove the hashtag of the abovementioned [include gcode.cfg] line. Then add the belonging command in your slicers start-gcode section as mentioned in that file to have it executed at the start of your print.
Attention though: you need to have that config file (which you referred to in that include line) existent though - if you don't have the file, Klipper won't start and reports an error message instead.
This might sound a bit confusing right now, so I'll try to clarify this with an example:
Imagine you want to use an additional Raspberry Pico with an ADXL345 sensor later for measuring resonances for Input Shaping. So you set up the hardware and then you create a file named adxl345.cfg for example. In this file you have all the settings for the set up hardware. In the main printer.cfg you add the line #[include adxl345.cfg] at the top.
Right now this file won't be loaded and executed, because you commented it with the hashtag right before the square bracket. So when you want to use the Pico with the sensor now and you plug it into the host Klipper is running on, you comment out the file by removing the hashtag, which "activates" the command and makes Klipper look out for this specific file to load during the start. Once you're done with the measuring and unplug the Pico again, you comment that line again by adding the hashtag, which 'deactivates' the command to look out for that specific file and load it.
If you don't do this and try to boot Klipper without the Pico being connected, Klipper won't start and reports an error message instead. Same goes for the case that you don't have that adxl345.cfg file existent and try to execute that include command.
Important Note On Include Files
The reason I'm going over this here is that in some printer.cfg files you can find there are certain [include whatever.cfg] lines already being listed. If you then try to use that printer config file but you don't have that specific files which should be included (or the hardware being referred to in that file isn't connected, like in the abovementioned example about the Pico), Klipper won't start and will report an error message instead.
The following screenshot shows an error report because of the missing file fluidd.cfg in the active line [include fluidd.cfg].

To get rid of this error message, either 'deactivate' that line like this #[include fluidd.cfg] or create the belonging file fluidd.cfg.
So whenever you use a printer config file from someone else, check if any [include whatever.cfg] lines are existent. If so, either delete those lines, 'deactivate' them by adding a hashtag right before that square bracket like this: #[include whatever.cfg] or lookout for / create the belonging config file.
You can then either run those macros by
- typing in the belonging shell command (which would be the macro's name) in the Mainsail UI console terminal for having that macro executed,
- adding a button to the Mainsail UI which you can simply click on for having the macro executed or
- have a macro executed automatically by adding that command to your slicer's gcode (e.g. you want to have a macro for a purge line be executed automatically before a print starts - add that macro's name to the start g-code section).
As I can't go into further details here, I'd highly recommend to read around about macros. To make the research easier for you, here are some links you can start with:
- The description about commands templates in the official documentation.
- The article "Klipper: Macros - Simply Explained" at all3dp.com which gives a nice and short overview about how macros work.
- The detailed article "Klipper Macros - What They Are and How to Use Them" at the Obicio blog.
- The article "Voidtrance Klipper Macros Beginners Guide of the Voron Design community.
- The "Macro Creation Tutorial" at Klipper's discourse group.
- The collection of Klipper macros by Justin Schuh.
Z-Offset
There are two z-offsets you need to set:
- the probe's z-offset (distance of the probe to the PEI plate) and
- the z-offset in relation to the z-endstop, which is the z-offset you already know from setting at the the stock firmware and which comes into account when printing the initial layer.
For doing so, you have to execute two different commands while you're proceeding the configuration checks:
PROBE_CALIBRATEfor setting the z-offset of the probe andZ_ENDSTOP_CALIBRATEfor setting the z-offset for the initial layer.
Please click on the links and read the official documentation about these commands and how to proceed.
Wait For The Printhead Being Moved
When executing the abovementioned commands, you need to move the probe to the center of the bed by typing in the specific X and Y coordinates. As an example, I have to move my head to X=72.5 and Y=106 for having the probe right above the center of the bed.
Once done with that, you then type in the belonging command for starting the actual calibration process. The head will move down a bit until the probe detects the PEI plate.
Once the surface has been detected, a little window will pop up (referring to the Mainsail UI here) which allows you to change the Z position.
BUT - and this is CRUCIAL! - the head will start to slowly move sidewards in this moment to position the nozzle right above the point where the probe has been located! You need to WAIT for this movement to be done! So inspect the head and wait until it doesn't move anymore before adjusting the actual height!
In the follwing, I'll just give you a short overview about these two kinds of z-offset to show you what the differences are and why you need to set both of them.
Probe's Z-Offset
The z-offset during PROBE_CALIBRATE is the z-offset of the probe to the bed.
It doesn't have an influence on the initial layer, but it's needed for e.g. the correct visual output of the graphical bedmesh later. So here you let Klipper know how far the probe is away from the plate.
Wait For The Printhead Being Moved
When executing the abovementioned commands, you need to move the probe to the center of the bed by typing in the specific X and Y coordinates. As an example, I have to move my head to X=72.5 and Y=106 for having the probe right above the center of the bed.
Once done with that, you then type in the belonging command for starting the actual calibration process. The head will move down a bit until the probe detects the PEI plate.
Once the surface has been detected, a little window will pop up (referring to the Mainsail UI here) which allows you to change the Z position.
BUT - and this is CRUCIAL! - the head will start to slowly move sidewards in this moment to position the nozzle right above the point where the probe has been located! You need to WAIT for this movement to be done! So inspect the head and wait until it doesn't move anymore before adjusting the actual height!
Once done, click on "ACCEPT" - and just to be on the safe side, send a SAVE_CONFIG command as well.
Endstop's Z-Offset
With Z_ENDSTOP_CALIBRATE you set the z-offset of the nozzle to the bed in relation to the endstop, which is the one that comes into account when starting a print.
It tells your Klipper which distance needs to be between the nozzle and triggering the endstop for printing the initial layer.
Wait For The Printhead Being Moved
When executing the abovementioned commands, you need to move the probe to the center of the bed by typing in the specific X and Y coordinates. As an example, I have to move my head to X=72.5 and Y=106 for having the probe right above the center of the bed.
Once done with that, you then type in the belonging command for starting the actual calibration process. The head will move down a bit until the probe detects the PEI plate.
Once the surface has been detected, a little window will pop up (referring to the Mainsail UI here) which allows you to change the Z position.
BUT - and this is CRUCIAL! - the head will start to slowly move sidewards in this moment to position the nozzle right above the point where the probe has been located! You need to WAIT for this movement to be done! So inspect the head and wait until it doesn't move anymore before adjusting the actual height!
Once done, click on "ACCEPT" - and just to be on the safe side, send a SAVE_CONFIG command as well.
This Is The Z-Offset For The Initial Layer!
This z-offset is the one which comes into account when printing the initial layer - you know this one from using the stock firmware and setting the z-offset there.
Attention When Adjusting The Z-Offset On The Fly
If you adjust your z-offset on the fly while printing your initial layer, you need to save that value to the endstop (not to the probe!) for having it applied the next times.
At the Mainsail UI for example there's a little button you can use for saving the changes you made while adjusting the offset on the fly. It shows a floppy disk symbol next to "SAVE" and a small arrow next to it. When you click on that arrow, a context menu opens up and you can choose whether to save your changes to the probe or the endstop as the following screenshot shows.

So when doing so, choose "TO ENDSTOP" for saving the new z-offset value for printing your perfect first layer next time. After doing so, execute a "SAVE_CONFIG".
Using The Probe As A Virtual Endstop
As mentioned, we have two different z-offsets here, due to the fact that we do have a probe and a z-axis limit switch. Therefore you have to set two different z-offsets as explained above.
Some users prefer to only set one z-offset value and use the probe as a virtual endstop for the z-axis and not using the z-axis limit switch at all. You can do so by adding the following line in the section [stepper_z] of your printer.cfg:
endstop_pin: probe:z_virtual_endstop
I personally wouldn't recommend to do so though.
The reason is simple: users already reported faulty probes, mostly due to broken wirings being caused by cableties being too tight.
Imho it's also more likely that the probe is getting somehow defective than the z-axis limit switch, as the probe is mounted to a moving part (the printhead). In that case the printer would drive the nozzle into the bed not only when executing an ABL measurement / bed mesh, but also when homing or starting a print. So keep that in mind and consider that risk when thinking about using the probe as a virtual z-endstop.
ABL, Bed Mesh, Manual Bed Leveling
Before I go into further details here, let me mention some of the (imho) most important advantages of Klipper compared to the stock firmware when it comes down to the ABL functionality:
- You can set the offset of the ABL sensor!
In the stock firmware, the offset of the probe's location isn't set correctly, therefore the compensation while printing isn't actually as precise as possible. As an example: the probe is located 37.5mm to the right and 4mm to the back in relation to the nozzle at the Neo (when looking at the printhead from the front). In the stock firmware, there's only the x-offset being set, the y-offset is not. That leads to the circumstance that the printer assumes that the nozzle and the probe are actually llined up - therefore the corrections being applied while compensating during printing just don't fit as much as they could, because the printer is compensating for a value which is 4mm off to the actual location of the nozzle. - You can set the amount of probed points as well as the algorithm of the probing, so you don't have to stick with the 5x5 grid.
- You can set the area where the probing should occur in general.
- You can even use certain macros which allow you to only probe the area you're going to print at before each print you're attempting.
- You can create different bedmeshes for e.g. different bed temperatures which you can then load when printing different types of filament (like one bedmesh done at 60°C bedtemp for PLA and one done at 80°C bedtemp for PETG and so on).
- You can do a bedmesh at any time without the need of setting the z-offset again (of yourse only in case you didn't change anything that had an impact on the z-offset, like tramming the bed or so).
Of course Klipper supports both ABL and manual bed leveling as well. Please see the official Klipper documentation for more detailed information about this topic, I'll only mention some notes about it here in the following. So before you continue to read here, maybe check out the official Klipper documentation first and read the chapters "Bed Level Support" and "Bed Level".
After executing an ABL sequence, you need to save those results for having them written to your printer.cfg file - they won't be saved automatically!
You can either choose an individual name or just save it as "default".
However, for loading the values and to get ABL to work while printing, you need to add a specific command to your [gcode_macro START_PRINT] file to load the bed mesh profile. This command BED_MESH_PROFILE LOAD=... has to be added after the last G28 (home the printer) command in there, with the belonging name of the mesh that should be loaded.
Here's an example of how it looks like with the belonging command for a bed mesh saved as "default".
If you chose individual names for different bed meshs (e.g. "mesh1"), you need to name the specific one you want to be loaded then in the abovementioned command (e.g. BED_MESH_PROFILE LOAD=mesh1).
If you saved the mesh using the "default" name like it's being suggested by the UI, enter the name "default" as shown above.
You can create different bedmeshs for e.g. different bed temperatures by using different names and load them automagically using e.g. the belonging name of the filament type being set in the Slicer. Means, you set the filament type in your Slicer and add a certain entry in the start g-code section of the Slicer, so that the filament type will be written into the generated g-code file. In addition to that you then write a macro for Klipper which then loads the belonging bedmesh for the type of filament being used, like the bedmesh you did at 60°C bed temperature for printing PLA or the one you did at 80°C for printing PETG.
You can configure the ABL procedure within your printer.cfg as well so that it fits your needs.
Means, you can change the amount and location of probing points, the probing speed and the amount of probes for each probing point. You can also choose between different probe algorithms.
As an example, this is the belonging section [bed_mesh] in the printer.cfg file:
[bed_mesh]
speed: 400
horizontal_move_z: 7
mesh_min: 32, 26
mesh_max: 189, 189
probe_count: 5, 5
relative_reference_index: 13
algorithm: lagrange
When you did everything correct, you can observe the ABL compensation working, as you can see in the following screencast of the Mainsail UI. Look at the changing value in those square brackets of the Z axis, right above the "Z 4.480" value.

Probe Count And Mesh Min/Max
As we have an inductive proximity sensor which has some sort of 'wide' probe surface and not a pointy one like a BL-Touch probe for example, it's advisable to not probe too close to the bed's borders and to not use too many probe counts, so that the probing will be reliable.
There are also solutions to do a bedmesh before every print which probe the specific area you're going to print on. So instead of probing the whole bedplate, only the belonging area will be probed:
Besides that, you can also use manual bed leveling in addition to the ABL, see the belonging description in the official Klipper documentation here.
This is especially useful for people who replaced the stock spacers of the bed with adjustable spacers for being able to tram the bed itself as well.
I'd suppose to also read the description of the function "screws_tilt_adjust" with the command "SCREWS_TILT_CALCULATE", which tells you exactly how much and in which direction you have to turn each screw to tram the bed (after configuring it for your printer) by using the probe.
Pressure Advance
By using Klipper you can take advantage of using a feature called "Pressure Advance".
Basically this function looks ahead while printing and adjusts the pressure of the filament, so that the typical over- and underextrusion at the beginning and end of a layer you often experience will be avoided.
This feature (called "Linear Advance" at Marlin firmware) can't be successfully used with the current stock firmware and the TMC2208 stepper drivers, so this is actually a huge plus for Klipper.
Please refer to the official Klipper documentation of Pressure Advance about how to calibrate and use it.
Resonance Compensation: Input Shaping
By using Klipper you can take advantage of using Resonance Compensation and a feature called "Input Shaping".
This function compensates certain resonances (after provoking them while measuring the x and y axis), which avoids artefacts of the printed model called 'ringing' and 'ghosting'. This is especially useful when printing at higher speeds.
You can calibrate it manually or by using additional hardware like ADXL345 acceleration sensors (recommended).
(..add images of ADXL solutions..)
Please refer to the official Klipper documentation of Resonance Compensation about how to calibrate and use it.
Stock Control Unit
The stock control unit of both the Go and the Neo don't work with Klipper, means, you can't use it for controlling the printer.
So is that going to be an issue? Actually I thought the same initially and that was the only reason which was holding me back switching to Klipper right away at the beginning. Now that I did switch, I can say that I don't really miss the control unit.
Just as an example:
- Klipper keeps the z-offset, so you don't have to fiddle arount at the control unit for that before each and every print because the stcok-fw forgot your settings once again.
- Setting temps for e.g. heating up the hotend to change a nozzle or load/unload filament can be done by using Mainsail.
- Initiating the ABL procedure is also be done through Mainsail, just like everything else.
However, if you really do miss the option to control the printer right at that place later, you have several options to do so:
- You can use your smartphone, tablet or laptop to just open the mainsail.local page at your browser and use the regular Mainsail frontend (which might be a bit 'uncomfortable' when using a smartphone though).
- You can use an old smartphone or tablet and install KlipperScreen onto it, which then gives you a nice adapted UI with control buttons.
I also set it up, printed a holder for it and mounted it where the original control unit was as shown in the picture below.

Actually I unplugged the phone again as I just control the printer via my computer and the mainsail.local page anyway though. It also kinda bothers me that I have to boot up the phone all the time as I don't leave the printer on 24/7, so I'll probably go with the next solution I'll mention. - If you have a Raspberry Pi or other hardware you could connect a touchscreen to (e.g. by using a HMDI port) running for hosting Mainsail, you can add a touchscreen to that and use KlipperScreen. It's the same UI like using a smartphone or tablet.
This is actually a quite handy solution if you're using a RPi as you can set everything up in a dedicated case. I'll probably do that as well, just for the pure comfort of not having to take care about switching the smartphone on and off as the display is powered by the RPi. I just didn't want to spend money again when trying Klipper initially, that's why I used an old smartphone in first place.
There is another use case for the stock control unit though: @jokubasver managed to use the stock control unit as a screen!
You need to wire it up to your RPi and have KlipperScreen running. As the stock control unit isn't a touchscreen and the knob isn't supported in KlipperScreen for operating/controlling Klipper, the unit only acts as a pure display, but at least you'll be able to use it and have the advantage of having certain status information present. The following picture shows this solution.

You can find his solution in the following GitHub repository: https://github.com/jokubasver/Anycubic-Kobra-Go-Neo-LCD-Driver
OctoPrint, Mainsail or Fluidd?
To find out what's the best solution for you, either do a little research on that, watch some YouTube videos or just get another mSD card for your RPi, install e.g. MainsailOS onto it and then just give it a try.
Due to the fact that I personally use and recommend Mainsail, I'll always refer to it when it comes down to describe or show certain things in this chapter.
OctoPrint
OctoPrint is mentioned and referred to at the Klipper page, so you can use it just fine.
You'd need to SSH to the host (e.g. the RPi) to upload edited files like the printer.cfg though - if there isn't a plugin for that which allows you to do so within the interface of OctoPrint (I don't know actually).
Mainsail
I personally prefer to use Mainsail with Klipper as it's tailored for Klipper and gives you more tools made for Klipper right away.
Just to mention a few here:
- You can edit the
printer.cfgand every other file just directly within Mainsail and don't have to SSH to the Raspberry Pi. - You already have a heightmap function included which allows you to create and display the meshview after executing an ABL.
- If your slicer does support it (SuperSlicer does), you can have thumbnails of your models displayed.
- There's also a G-Code viewer already built in.
- You have the possibilty to create custom macros and add scripts for e.g. executing backups and activate them with one click.
- And much more..
Please see the official documentation site for further information.
(add screenshot)
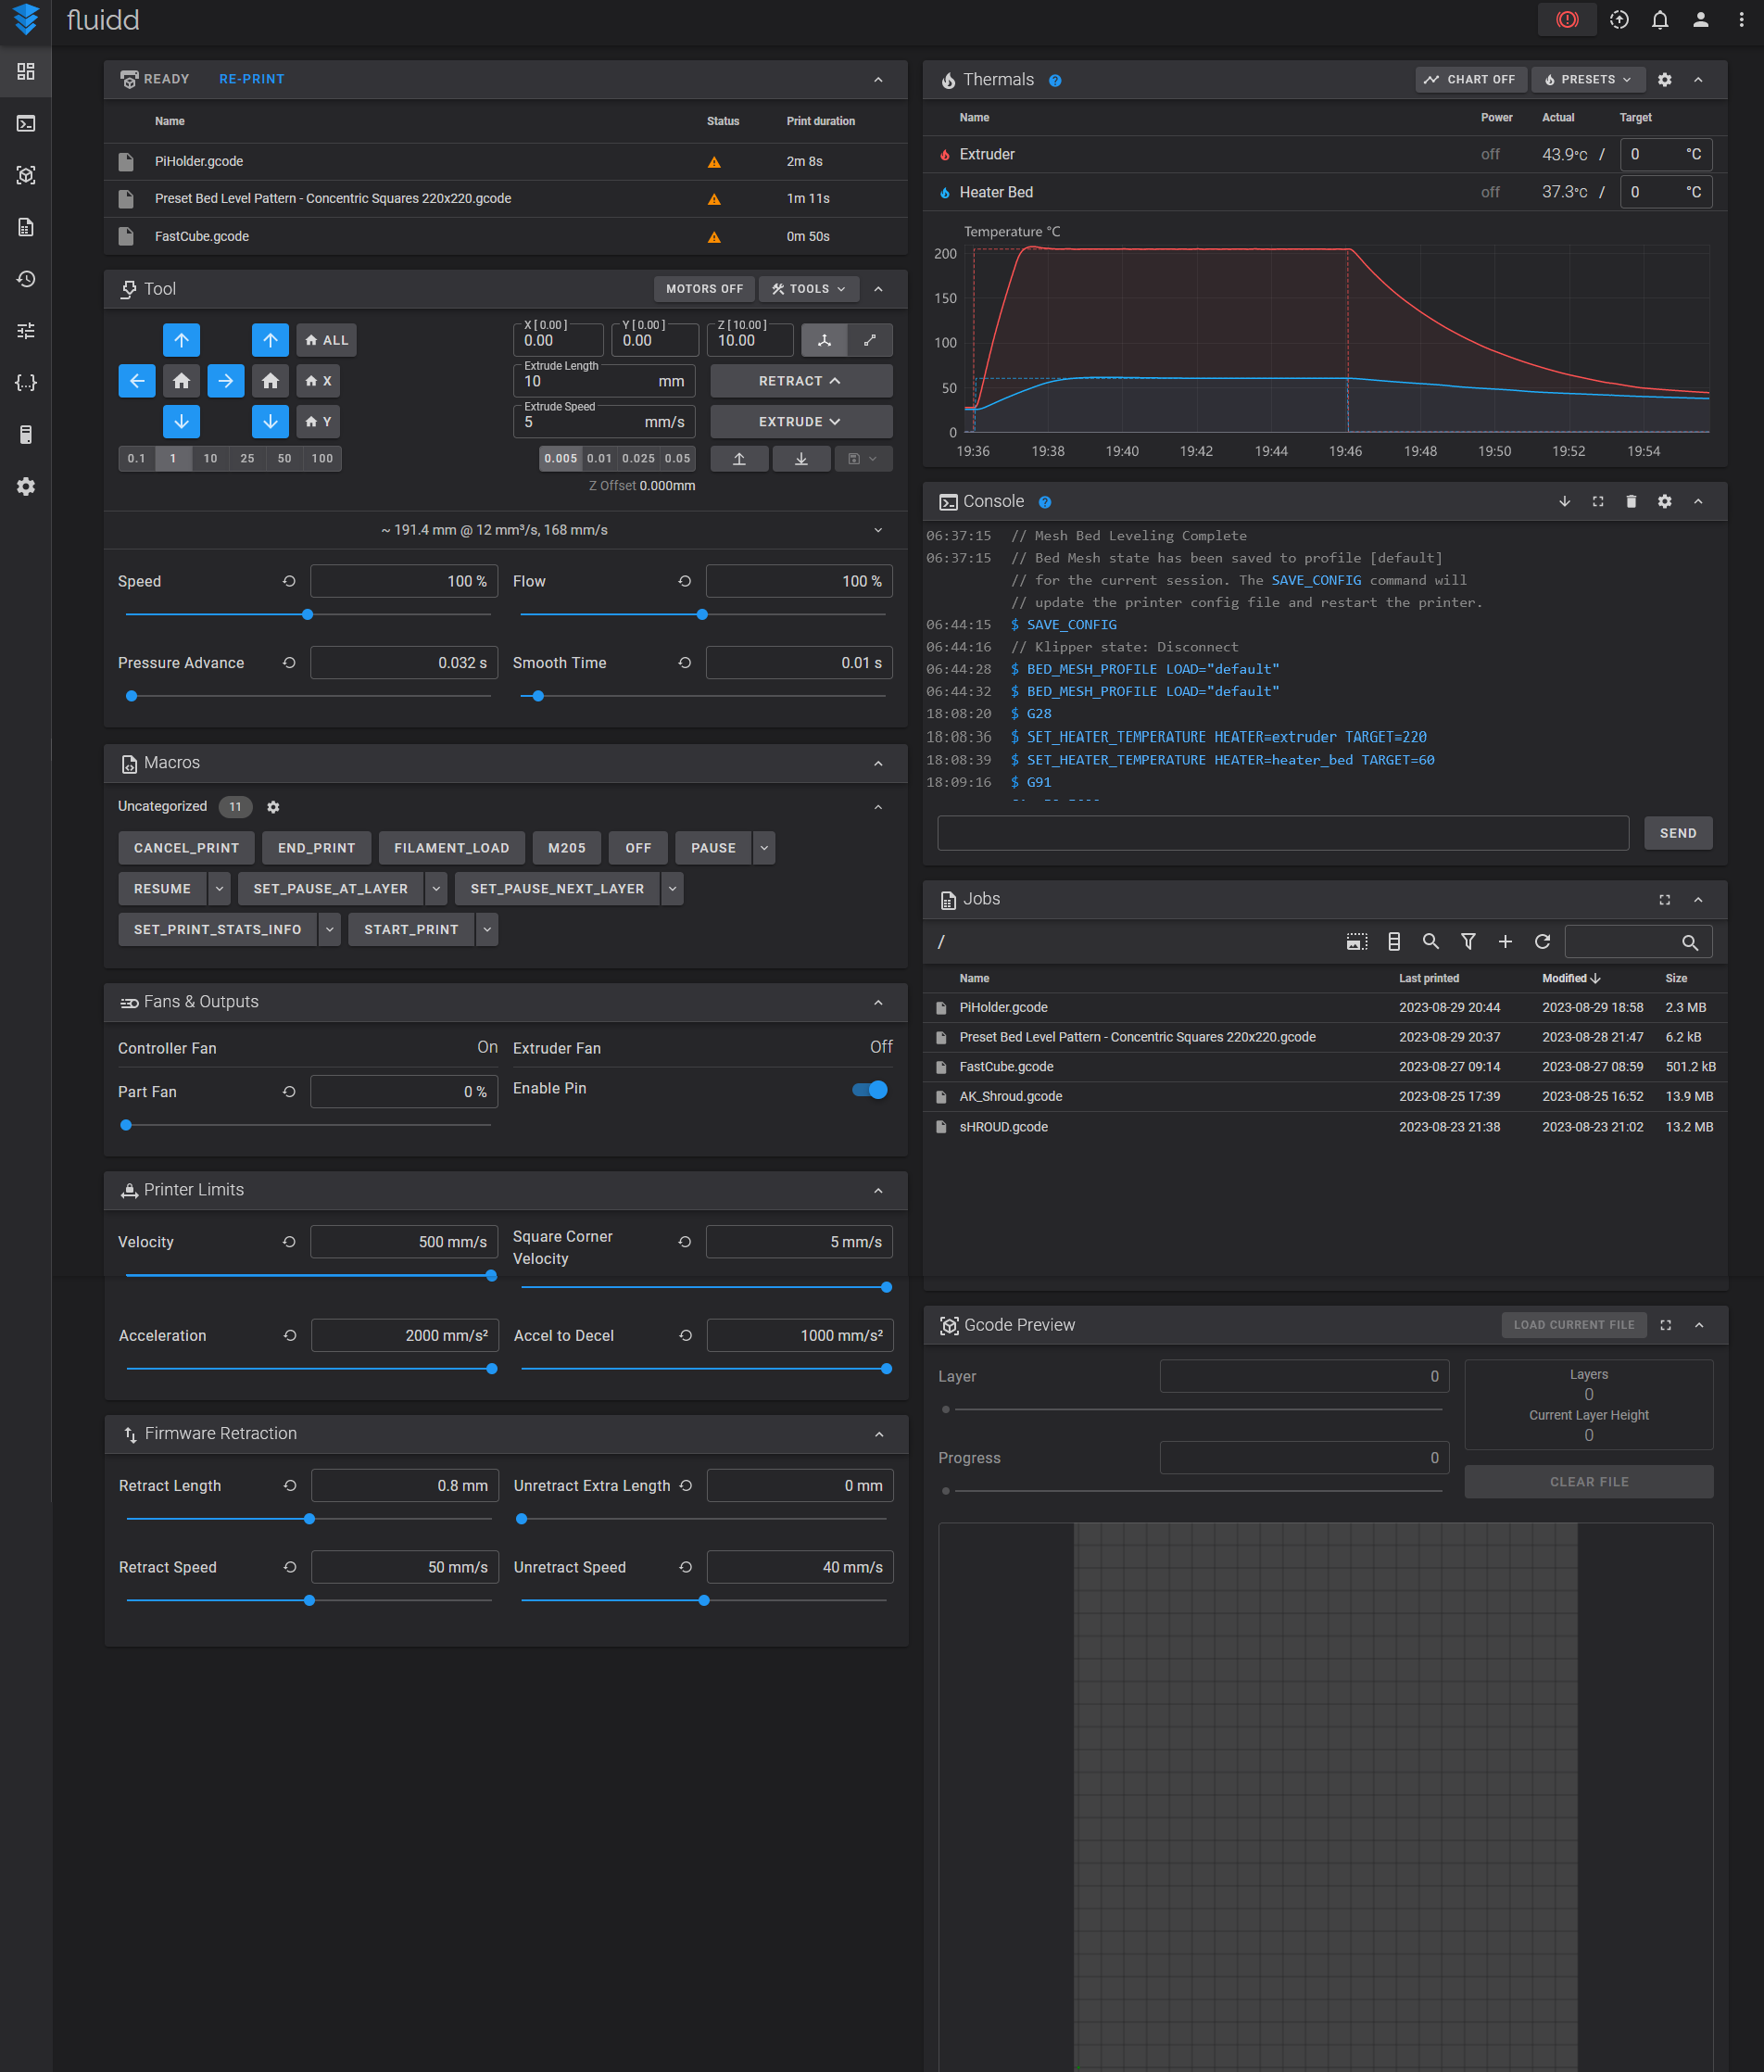
Fluidd
Fluidd is kinda similar to Mainsail, so it's a great alternative if you don't want to use Mainsail. Please see the official documentation site for further information.
The following screenshot shows the dashboard overview of Fluidd (without a camera for monitoring the printer being used).