Back to TOC
Back to chapter 11
12. Excursus: Arduino IDE
In the following, the use of the Arduino IDE v1.x and the installation of the required board libraries for the Arduino Due and the ESP32 will be briefly described.
Finally, the use of the Serial Monitor (SerMo) of the Arduino IDE is briefly presented, which can be used to e.g. observe the startup behavior of the Arduino Due/ESP32, and to identify any errors which may occur more easily.
12.1 Installation
Installation of the Arduino IDE
Download and install the latest version of the Arduino IDE from https://www.arduino.cc/en/Main/Software for your operating system (Windows, Mac and Linux version available).
12.1.1 Arduino Due
Installation of the Specific Libraries
- Start the Arduino IDE and open the “Board Manager” under “Tools/Board”.
- In the dialog box that opens, type “Arduino SAM Boards” in the search line at the top where the Due is included.
-
Click on the entry “Arduino SAM Boards (32-bits ARM Cortex-M3) by Arduino” and then on the “Install” button.

The correctly installed SAM framework (ARM Cortex-M3) for the Arduino Due in the board manager.
Now you should be able to find and select the Due in the listing at “Tools/Board”.
12.1.2 ESP32
Installation of the Specific Libraries
- Start the Arduino IDE and click on “File/Preferences” (Shortcut: Ctrl+Comma).
- In the dialog window that opens now insert the following link in the input field at the bottom of “Additional board manager URLs”:
https://raw.githubusercontent.com/espressif/arduino-esp32/gh-pages/package_esp32_index.json. If there are already one or more URLs in the field, the additional entry can simply be added to the existing entries separated by a comma. -
Then click on “OK”.
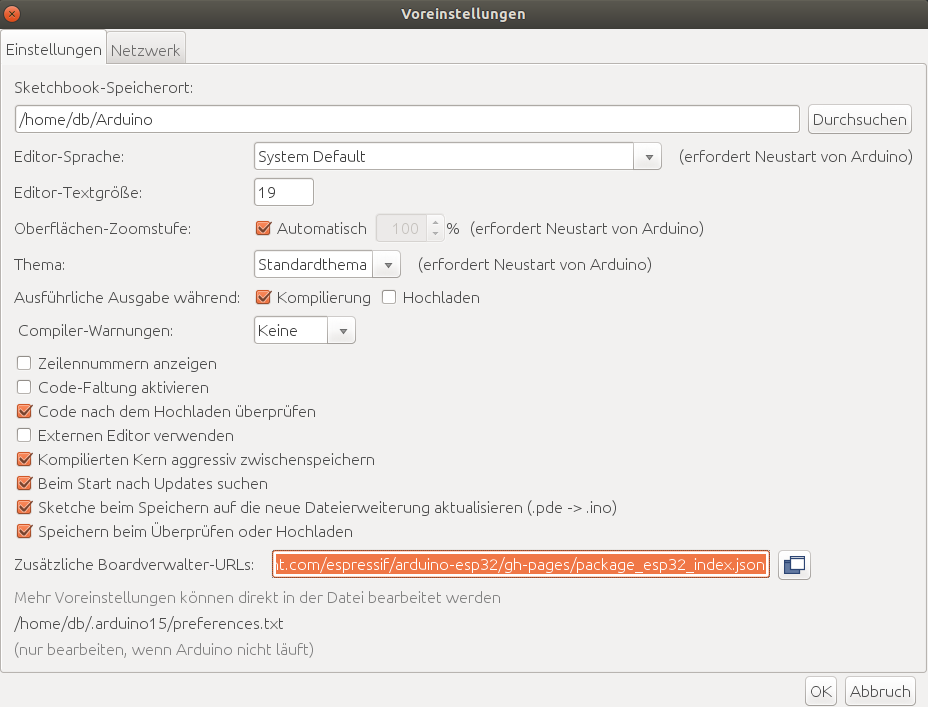
The “Preferences” dialog box with the added link in the “Additional board manager URLs” line.
- Next, open the “Board Manager” under “Tools/Board”.
- In the dialog box that opens, type “ESP32” in the search line at the top.
- Then search for the entry “esp32 by Espressif Systems”.
-
Click on the entry, select version 2.0.2 (or higher if available) and then click on the “Install” button. If you have a version lower than 2.0.2 installed, please update to 2.0.2 (or higher).

The correctly installed ESP32 framework in the board manager.
Now you should be able to find and select the ESP32 board in the listing at “Tools/Board”.
12.2 Serial Monitor
Using the Serial Monitor
The Serial Monitor (short: SerMo) is a useful tool to observe e.g. the startup behavior and the data traffic of the microcontroller. So it is possible to find errors or to record unknown telegrams.
To use the SerMo please proceed as follows:
- Connect your BSB-LAN setup via USB to your computer.
- Start the Arduino IDE by double clicking on the file BSB_LAN.ino.
- Now select your board type, port etc. accordingly.
- Now start the “Serial Monitor”. This can be done either via “Tools/Serial Monitor” (Shortcut: Ctrl+Shift+M) or simply by clicking on the magnifying glass icon in the upper right corner of the Arduino IDE toolbar.
The moment you start the Serial Monitor, the connected microcontroller (Due/ESP32) will be restarted.
If you have configured everything correctly, you can observe the startup process and the sending and receiving of telegrams (an exemplary output can be found at the end of this chapter).
However, if only illegible cryptic characters appear, check the setting of the transmission rate: this is at the bottom right and should be set to 115200 baud.
It is also a good idea to check “Timestamp” and to set “Both NL and CR” in the field to the left of the transmission rate.

The bottom line of the SerMo with the corresponding settings.
If you send URL commands via the web interface, for example, you will see the corresponding commands or telegrams in the SerMo output. Regularly arriving INF telegrams are broadcasts that are sent by the heating controller or by the connected control unit and possibly also by an additional room device. The boiler temperature is sent from the control unit approximately every ten seconds, and the room temperature is usually sent from a room unit.
If you now call up a certain parameter on the control unit, for example, then this parameter and the corresponding value are not only shown on the display of the control unit, but also in SerMo. In this way, for example, unknown, new parameters of a heating controller and their associated telegrams can be decoded (see chap. 09).
Note:
If you contact us (Frederik and me, Ulf) with questions or problems, you will most likely get a request to send a “SerMo log”. This means that you should create a log of the SerMo output.
To do this, uncheck “Autoscroll” at the bottom left of the SerMo window (so that the output doesn’t scroll regularly) and then select the desired lines with the mouse. With copy&paste you can paste the output into a text editor and save the file as txt-file (or post it in the forum pasted in codetags).
The following is an example of a SerMo output of a successful start of a BSB LAN setup with an Arduino Due and a connected RVS43 controller including INF messages of the connected control unit, which sends the boiler temperature as a broadcast approx. every ten seconds:
12:25:46.361 -> READY
12:25:46.388 -> Reading EEPROM
12:25:47.084 -> Reading done.
12:25:47.084 -> EEPROM schema v.5 Program schema v.5
12:25:47.084 -> Address EEPROM option 0: 0
12:25:47.084 -> Address EEPROM option 1: 1
12:25:47.084 -> Address EEPROM option 2: 2
12:25:47.084 -> Address EEPROM option 3: 6
12:25:47.084 -> Address EEPROM option 4: 226
12:25:47.084 -> Address EEPROM option 5: 306
12:25:47.084 -> Address EEPROM option 6: 490
12:25:47.118 -> Address EEPROM option 7: 491
12:25:47.118 -> Address EEPROM option 8: 492
12:25:47.118 -> Address EEPROM option 9: 493
12:25:47.118 -> Address EEPROM option 10: 494
12:25:47.118 -> Address EEPROM option 11: 495
12:25:47.118 -> Address EEPROM option 12: 499
12:25:47.118 -> Address EEPROM option 13: 500
12:25:47.118 -> Address EEPROM option 14: 660
12:25:47.118 -> Address EEPROM option 15: 661
12:25:47.118 -> Address EEPROM option 16: 665
12:25:47.118 -> Address EEPROM option 17: 825
12:25:47.118 -> Address EEPROM option 18: 831
12:25:47.118 -> Address EEPROM option 19: 832
12:25:47.118 -> Address EEPROM option 20: 836
12:25:47.151 -> Address EEPROM option 21: 840
12:25:47.151 -> Address EEPROM option 22: 844
12:25:47.151 -> Address EEPROM option 23: 848
12:25:47.151 -> Address EEPROM option 24: 850
12:25:47.151 -> Address EEPROM option 25: 854
12:25:47.151 -> Address EEPROM option 26: 858
12:25:47.151 -> Address EEPROM option 27: 922
12:25:47.151 -> Address EEPROM option 28: 986
12:25:47.151 -> Address EEPROM option 29: 987
12:25:47.151 -> Address EEPROM option 30: 988
12:25:47.151 -> Address EEPROM option 31: 998
12:25:47.151 -> Address EEPROM option 32: 999
12:25:47.239 -> Address EEPROM option 33: 1159
12:25:47.239 -> Address EEPROM option 34: 1160
12:25:47.239 -> Address EEPROM option 35: 1164
12:25:47.239 -> Address EEPROM option 36: 1165
12:25:47.239 -> Address EEPROM option 37: 1166
12:25:47.239 -> Address EEPROM option 38: 1167
12:25:47.239 -> Address EEPROM option 39: 1171
12:25:47.239 -> Address EEPROM option 40: 1203
12:25:47.239 -> Address EEPROM option 41: 1235
12:25:47.239 -> Address EEPROM option 42: 1267
12:25:47.239 -> Address EEPROM option 43: 1299
12:25:47.239 -> Address EEPROM option 44: 1301
12:25:47.239 -> Address EEPROM option 45: 1302
12:25:47.239 -> Address EEPROM option 46: 1303
12:25:47.239 -> Address EEPROM option 47: 1304
12:25:47.239 -> Address EEPROM option 48: 1336
12:25:47.239 -> Address EEPROM option 49: 1400
12:25:47.239 -> Address EEPROM option 50: 1420
12:25:47.239 -> Address EEPROM option 51: 1440
12:25:47.239 -> Address EEPROM option 52: 1460
12:25:47.239 -> Address EEPROM option 53: 1461
12:25:47.239 -> Address EEPROM option 54: 1462
12:25:47.239 -> Address EEPROM option 55: 1463
12:25:47.239 -> Size of cmdtbl1: 29568
12:25:47.239 -> Size of cmdtbl2: 38616
12:25:47.239 -> Size of cmdtbl3: 26496
12:25:47.239 -> free RAM: 81703
12:25:47.239 -> Init One Wire bus...
12:25:47.239 -> numSensors: 0
12:25:47.239 -> PPS settings:
12:25:47.239 -> Starting SD..failed
12:25:52.197 -> 192.168.178.37
12:25:52.197 -> 255.255.255.0
12:25:52.197 -> 192.168.178.1
12:25:52.197 -> Waiting 3 seconds to give Ethernet shield time to get ready...
12:25:52.197 -> Calculating free space on SD...0 MB free
12:25:55.387 -> Start network services
12:25:55.751 -> LAN->HEIZ QUR 6225 Konfiguration - Gerätefamilie:
12:25:55.751 -> DC C2 00 0B 06 3D 05 00 02 52 88
12:25:55.751 -> HEIZ->LAN ANS 6225 Konfiguration - Gerätefamilie: 96
12:25:55.784 -> DC 80 42 0E 07 05 3D 00 02 00 00 60 5E 3E
12:25:55.784 -> #6225: 96
12:25:55.950 -> LAN->HEIZ QUR 6226 Konfiguration - Gerätevariante:
12:25:55.950 -> DC C2 00 0B 06 3D 05 00 03 42 A9
12:25:55.983 -> HEIZ->LAN ANS 6226 Konfiguration - Gerätevariante: 100
12:25:55.983 -> DC 80 42 0E 07 05 3D 00 03 00 00 64 68 0E
12:25:55.983 -> #6226: 100
12:25:55.983 -> Device family: 96
12:25:55.983 -> Device variant: 100
12:25:55.983 ->
12:25:55.983 -> Setup complete
12:26:00.698 -> DSP1->HEIZ QUR 8310 Diagnose Erzeuger - Kesseltemperatur:
12:26:00.698 -> DC 8A 00 0B 06 3D 0D 05 19 4F 8C
12:26:00.764 -> HEIZ->DSP1 ANS 8310 Diagnose Erzeuger - Kesseltemperatur: 41.0 °C
12:26:00.797 -> DC 80 0A 0E 07 0D 3D 05 19 00 0A 41 08 A5
12:26:10.889 -> DSP1->HEIZ QUR 8310 Diagnose Erzeuger - Kesseltemperatur:
12:26:10.889 -> DC 8A 00 0B 06 3D 0D 05 19 4F 8C
12:26:10.989 -> HEIZ->DSP1 ANS 8310 Diagnose Erzeuger - Kesseltemperatur: 41.0 °C
12:26:10.989 -> DC 80 0A 0E 07 0D 3D 05 19 00 0A 41 08 A5
12:26:21.116 -> DSP1->HEIZ QUR 8310 Diagnose Erzeuger - Kesseltemperatur:
12:26:21.116 -> DC 8A 00 0B 06 3D 0D 05 19 4F 8C
12:26:21.182 -> HEIZ->DSP1 ANS 8310 Diagnose Erzeuger - Kesseltemperatur: 41.0 °C
12:26:21.215 -> DC 80 0A 0E 07 0D 3D 05 19 00 0A 41 08 A5
